")
- Beiträge: 122
- Dank erhalten: 91
 Frage
Laser engraving - Star Wars Stormtrooper 2W m140
Frage
Laser engraving - Star Wars Stormtrooper 2W m140
- Mr. B
-
 Autor
Autor
- Offline
- Forum Nutzer
-

Weniger
Mehr
12 Mär 2015 21:24 - 12 Mär 2015 21:26 #17173
von Mr. B
Stepcraft 420 (version 1) - HXKJ-GS52-400W Air cooled DC spindle - 445nm Blue Laser diode G2
Dieser Beitrag enthält einen Bildanhang.
Laser engraving - Star Wars Stormtrooper 2W m140 wurde erstellt von Mr. B
Laser engraving - Star Wars Stormtrooper
Stepcraft 420
2W m140 445nm blue laser diode
See youtube clip
Stepcraft 420
2W m140 445nm blue laser diode
See youtube clip
Stepcraft 420 (version 1) - HXKJ-GS52-400W Air cooled DC spindle - 445nm Blue Laser diode G2
Dieser Beitrag enthält einen Bildanhang.
Bitte anmelden (oder registrieren) um ihn zu sehen.
Letzte Änderung: 12 Mär 2015 21:26 von Mr. B.
Folgende Benutzer bedankten sich: Rory
Bitte Anmelden oder Registrieren um der Konversation beizutreten.
- frankjoke
-

- Offline
- Forum Nutzer
-
Weniger
Mehr
- Beiträge: 267
- Dank erhalten: 95
12 Mär 2015 22:32 #17175
von frankjoke
Frank
Steppcraft 600/2 + HF500 + SwitchBox + Laser + Schleppmesser
Absaugung und Vakuumtisch
an Mach3 oder UCCNC mit Taster für Z-Null und Werkzeuglänge
frankjoke antwortete auf Laser engraving - Star Wars Stormtrooper 2W m140
Eigentlich nur zwei Fragen:
- Woher?
- Wie?
Frank
Steppcraft 600/2 + HF500 + SwitchBox + Laser + Schleppmesser
Absaugung und Vakuumtisch
an Mach3 oder UCCNC mit Taster für Z-Null und Werkzeuglänge
Bitte Anmelden oder Registrieren um der Konversation beizutreten.
- Mr. B
-
Autor
- Offline
- Forum Nutzer
-
Weniger
Mehr
- Beiträge: 122
- Dank erhalten: 91
12 Mär 2015 22:48 #17177
von Mr. B
Stepcraft 420 (version 1) - HXKJ-GS52-400W Air cooled DC spindle - 445nm Blue Laser diode G2
Mr. B antwortete auf Laser engraving - Star Wars Stormtrooper 2W m140
Krank schreiben Sie einen Kommentar mit Details, was verwendet wird und wie morgen .
Stepcraft 420 (version 1) - HXKJ-GS52-400W Air cooled DC spindle - 445nm Blue Laser diode G2
Bitte Anmelden oder Registrieren um der Konversation beizutreten.
- Worldhusky
-

- Offline
- Forum Nutzer
-
Weniger
Mehr
- Beiträge: 986
- Dank erhalten: 786
12 Mär 2015 23:35 #17181
von Worldhusky
Hi frankjoke,
if you like to participate in this English forum - please stick to the language and post your questions and comments also in English.
It's just polite and I'm sure that nobody will judge you for "little" spelling mistakes!")
It's not only about tools it's also about skills!
Worldhusky antwortete auf Laser engraving - Star Wars Stormtrooper 2W m140
frankjoke schrieb: Eigentlich nur zwei Fragen:
- Woher?
- Wie?
Hi frankjoke,
if you like to participate in this English forum - please stick to the language and post your questions and comments also in English.
It's just polite and I'm sure that nobody will judge you for "little" spelling mistakes!
It's not only about tools it's also about skills!
Folgende Benutzer bedankten sich: ThomasDbg
Bitte Anmelden oder Registrieren um der Konversation beizutreten.
- Worldhusky
-
- Offline
- Forum Nutzer
-
Weniger
Mehr
- Beiträge: 986
- Dank erhalten: 786
12 Mär 2015 23:42 #17182
von Worldhusky

It's not only about tools it's also about skills!
Worldhusky antwortete auf Laser engraving - Star Wars Stormtrooper 2W m140
Laser engraving? Interesting! I'm looking forward to read more about the setup.blanthegenius schrieb: Laser engraving - Star Wars Stormtrooper
Stepcraft 420
2W m140 445nm blue laser diode
It's not only about tools it's also about skills!
Bitte Anmelden oder Registrieren um der Konversation beizutreten.
- Sickone4
-

- Offline
- Forum Nutzer
-
- staatl. gepr. Automatisierungstechniker
Weniger
Mehr
- Beiträge: 480
- Dank erhalten: 175
13 Mär 2015 08:27 #17185
von Sickone4
Gruß
Sven
Seit vierundsechzig Minuten sitzt Peter schon an einem runden Tisch in einem Besprechungszimmer und wartet. Er ist exakt vierundsechzig Minuten schlechter gelaunt als vor vierundsechzig Minuten,
SC600/I - HF500 - WinPC-NC USB + Handrad
ESTLCam - CorelDRAW X7 - Cut3D - SketchUp -...
Sickone4 antwortete auf Laser engraving - Star Wars Stormtrooper 2W m140
Is this an
kaleCNC Laser
?
Gruß
Sven
Seit vierundsechzig Minuten sitzt Peter schon an einem runden Tisch in einem Besprechungszimmer und wartet. Er ist exakt vierundsechzig Minuten schlechter gelaunt als vor vierundsechzig Minuten,
SC600/I - HF500 - WinPC-NC USB + Handrad
ESTLCam - CorelDRAW X7 - Cut3D - SketchUp -...
Bitte Anmelden oder Registrieren um der Konversation beizutreten.
- Sickone4
-
- Offline
- Forum Nutzer
-
- staatl. gepr. Automatisierungstechniker
Weniger
Mehr
- Beiträge: 480
- Dank erhalten: 175
13 Mär 2015 11:29 #17193
von Sickone4
Gruß
Sven
Seit vierundsechzig Minuten sitzt Peter schon an einem runden Tisch in einem Besprechungszimmer und wartet. Er ist exakt vierundsechzig Minuten schlechter gelaunt als vor vierundsechzig Minuten,
SC600/I - HF500 - WinPC-NC USB + Handrad
ESTLCam - CorelDRAW X7 - Cut3D - SketchUp -...
Sickone4 antwortete auf Laser engraving - Star Wars Stormtrooper 2W m140
anyways... you should think about an external exhaust system. the fumes are toxic...
Gruß
Sven
Seit vierundsechzig Minuten sitzt Peter schon an einem runden Tisch in einem Besprechungszimmer und wartet. Er ist exakt vierundsechzig Minuten schlechter gelaunt als vor vierundsechzig Minuten,
SC600/I - HF500 - WinPC-NC USB + Handrad
ESTLCam - CorelDRAW X7 - Cut3D - SketchUp -...
Folgende Benutzer bedankten sich: Mr. B
Bitte Anmelden oder Registrieren um der Konversation beizutreten.
- drilldevil
-
- Offline
- Forum Nutzer
-
Weniger
Mehr
- Beiträge: 1393
- Dank erhalten: 255
13 Mär 2015 12:07 #17200
von drilldevil
Andreas
drilldevil antwortete auf Laser engraving - Star Wars Stormtrooper 2W m140
hi,
usually the laser optic should be as short as possible above the material to improve the focus.
usually the laser optic should be as short as possible above the material to improve the focus.
Andreas
Folgende Benutzer bedankten sich: Mr. B
Bitte Anmelden oder Registrieren um der Konversation beizutreten.
- Sickone4
-
- Offline
- Forum Nutzer
-
- staatl. gepr. Automatisierungstechniker
Weniger
Mehr
- Beiträge: 480
- Dank erhalten: 175
13 Mär 2015 12:32 #17201
von Sickone4
Gruß
Sven
Seit vierundsechzig Minuten sitzt Peter schon an einem runden Tisch in einem Besprechungszimmer und wartet. Er ist exakt vierundsechzig Minuten schlechter gelaunt als vor vierundsechzig Minuten,
SC600/I - HF500 - WinPC-NC USB + Handrad
ESTLCam - CorelDRAW X7 - Cut3D - SketchUp -...
Sickone4 antwortete auf Laser engraving - Star Wars Stormtrooper 2W m140
an absolut good reference ->
i can truly recommend this! (basicly this is one cause of more in and outputs i need") )
)
you can also find videos about building the lasershoe II on his channel!
i can truly recommend this! (basicly this is one cause of more in and outputs i need
you can also find videos about building the lasershoe II on his channel!
Gruß
Sven
Seit vierundsechzig Minuten sitzt Peter schon an einem runden Tisch in einem Besprechungszimmer und wartet. Er ist exakt vierundsechzig Minuten schlechter gelaunt als vor vierundsechzig Minuten,
SC600/I - HF500 - WinPC-NC USB + Handrad
ESTLCam - CorelDRAW X7 - Cut3D - SketchUp -...
Folgende Benutzer bedankten sich: Mr. B
Bitte Anmelden oder Registrieren um der Konversation beizutreten.
- Mr. B
-
Autor
- Offline
- Forum Nutzer
-
Weniger
Mehr
- Beiträge: 122
- Dank erhalten: 91
13 Mär 2015 20:21 #17233
von Mr. B
Stepcraft 420 (version 1) - HXKJ-GS52-400W Air cooled DC spindle - 445nm Blue Laser diode G2
Dieser Beitrag enthält Bilddateien.
Mr. B antwortete auf Laser engraving - Star Wars Stormtrooper 2W m140
PLEASE NOTE I WILL NOT BE HELD RESPONSIBLE FOR ANY DAMAGES INCURRED, TO SOFTWARE, HARDWARE, SAFETY WEAR, OR PERSONAL INJURY, FROM ANY MODIFICATIONS MADE IN RELATION TO THIS INFORMATION, AS USING A LASER DEVICE IS DANGEROUS.
Ok I'm a complete novice when it comes to laser cncing, here's how I've set it up.
Any hints and tips will be much appreciated thanks.
Safety Glasses: Uvex S1933X Skyper Safety...e Uv Extreme Anti-Fog Lens
Tested on the Laser Pointer Forum Click here
Power supply: An old CB radio Power Supply 13 volts max at 3 amps
Laser driver: Click here
Laser diode: Click here
Connection: Dsub 15 pin 2 row male
Connection / Software:
The Dsub connector from TTL on the controller goes to ground pin and relay 1 pin
(ref to this can also be found in the Operating instructions manual on page 15/16).
If you are using vCarvePro v6+ you can modify the post processor file
(help files can be found on the vectric website).
We modified it so that Z plunge is a M03 which starts spindle and Z retract M05 is stop spindle also remove any reference to [Z].
This is in metric [1.3] G21 G71
in inches it is [1.4] G20 G70
Best regards
Blan
Ok I'm a complete novice when it comes to laser cncing, here's how I've set it up.
Any hints and tips will be much appreciated thanks.
Safety Glasses: Uvex S1933X Skyper Safety...e Uv Extreme Anti-Fog Lens
Tested on the Laser Pointer Forum Click here
Power supply: An old CB radio Power Supply 13 volts max at 3 amps
Laser driver: Click here
Laser diode: Click here
Connection: Dsub 15 pin 2 row male
Connection / Software:
The Dsub connector from TTL on the controller goes to ground pin and relay 1 pin
(ref to this can also be found in the Operating instructions manual on page 15/16).
If you are using vCarvePro v6+ you can modify the post processor file
(help files can be found on the vectric website).
We modified it so that Z plunge is a M03 which starts spindle and Z retract M05 is stop spindle also remove any reference to [Z].
This is in metric [1.3] G21 G71
in inches it is [1.4] G20 G70
+================================================
+
+ Laser Mach2/3 - Vectric machine output configuration file
+
+================================================
+
+ History

POST_NAME = "Mach2/3 Laser (mm) (*.txt)"

FILE_EXTENSION = "txt"

UNITS = "MM"

DIRECT_OUTPUT = "Mach|Mach4.Document"

SUBSTITUTE = "({)}"

+------------------------------------------------
+    Line terminating characters
+------------------------------------------------

LINE_ENDING = "[13][10]"

+------------------------------------------------
+    Block numbering
+------------------------------------------------

LINE_NUMBER_START     = 0
LINE_NUMBER_INCREMENT = 10
LINE_NUMBER_MAXIMUM = 999999

+================================================
+
+    Formating for variables
+
+================================================

VAR LINE_NUMBER = [N|A|N|1.0]
VAR SPINDLE_SPEED = [S|A|S|1.0]
VAR FEED_RATE = [F|C|F|1.1]
VAR X_POSITION = [X|C|X|1.3]
VAR Y_POSITION = [Y|C|Y|1.3]
VAR Z_POSITION = [Z|C|Z|1.3]
VAR ARC_CENTRE_I_INC_POSITION = [I|A|I|1.3]
VAR ARC_CENTRE_J_INC_POSITION = [J|A|J|1.3]
VAR X_HOME_POSITION = [XH|A|X|1.3]
VAR Y_HOME_POSITION = [YH|A|Y|1.3]
VAR Z_HOME_POSITION = [ZH|A|Z|1.3]
VAR SAFE_Z_HEIGHT = [SAFEZ|A|Z|1.3]
+================================================
+
+    Block definitions for toolpath output
+
+================================================

+---------------------------------------------------
+  Commands output at the start of the file
+---------------------------------------------------

begin HEADER

"( [TP_FILENAME] )"
"( File created: [DATE] - [TIME])"
"( for Mach2/3 Laser )"
"[N]G00G21G17G90G40G49G80"
"[N]G71G91.1"
"[N][S]M05"
"[N]G94"

+---------------------------------------------------
+ Commands output for Plunge Moves
+---------------------------------------------------
begin PLUNGE_MOVE
"[N][S]M03"

+---------------------------------------------------
+ Commands output for Retract Moves
+---------------------------------------------------
begin RETRACT_MOVE
"[N][S]M05"

+---------------------------------------------------
+  Commands output for rapid moves
+---------------------------------------------------

begin RAPID_MOVE

"[N]G00[X][Y]"


+---------------------------------------------------
+  Commands output for the first feed rate move
+---------------------------------------------------

begin FIRST_FEED_MOVE

"[N]G1[X][Y][F]"


+---------------------------------------------------
+  Commands output for feed rate moves
+---------------------------------------------------

begin FEED_MOVE

"[N]G1[X][Y]"

+---------------------------------------------------
+  Commands output for the first clockwise arc move
+---------------------------------------------------

begin FIRST_CW_ARC_MOVE

"[N]G2[X][Y][I][J][F]"

+---------------------------------------------------
+  Commands output for clockwise arc  move
+---------------------------------------------------

begin CW_ARC_MOVE

"[N]G2[X][Y][I][J]"

+---------------------------------------------------
+  Commands output for the first counterclockwise arc move
+---------------------------------------------------

begin FIRST_CCW_ARC_MOVE

"[N]G3[X][Y][I][J][F]"

+---------------------------------------------------
+  Commands output for counterclockwise arc  move
+---------------------------------------------------

begin CCW_ARC_MOVE

"[N]G3[X][Y][I][J]"


+---------------------------------------------------
+  Commands output at the end of the file
+---------------------------------------------------

begin FOOTER

"[N]M05"
"[N]M09"
"[N]M30"
%
Best regards
Blan
Stepcraft 420 (version 1) - HXKJ-GS52-400W Air cooled DC spindle - 445nm Blue Laser diode G2
Dieser Beitrag enthält Bilddateien.
Bitte anmelden (oder registrieren) um sie zu sehen.
Folgende Benutzer bedankten sich: frankjoke, druckgott
Bitte Anmelden oder Registrieren um der Konversation beizutreten.
- frankjoke
-
- Offline
- Forum Nutzer
-
Weniger
Mehr
- Beiträge: 267
- Dank erhalten: 95
13 Mär 2015 23:38 #17238
von frankjoke
Frank
Steppcraft 600/2 + HF500 + SwitchBox + Laser + Schleppmesser
Absaugung und Vakuumtisch
an Mach3 oder UCCNC mit Taster für Z-Null und Werkzeuglänge
frankjoke antwortete auf Laser engraving - Star Wars Stormtrooper 2W m140
Worldhusky schrieb:
frankjoke schrieb:
Hi frankjoke,
if you like to participate in this English forum - please stick to the language and post your questions and comments also in English.
Sorry, 4got but I am reading by 'newest' posts and forget sometimes which language
Anyhow, my questions were raised in English already in the meantime:
What?
How?
Would love to build a laser 'spindle' as well
Frank
Steppcraft 600/2 + HF500 + SwitchBox + Laser + Schleppmesser
Absaugung und Vakuumtisch
an Mach3 oder UCCNC mit Taster für Z-Null und Werkzeuglänge
Bitte Anmelden oder Registrieren um der Konversation beizutreten.
- druckgott
-
- Offline
- Forum Nutzer
-
Weniger
Mehr
- Beiträge: 310
- Dank erhalten: 230
14 Mär 2015 07:56 #17241
von druckgott
SC 420 SolidEdge--> FilouNC12--> Mach3
cnc-wiki.de/
druckgott antwortete auf Laser engraving - Star Wars Stormtrooper 2W m140
is it possible to cut 4mm wood with this laser? and how long des it take or how much mm per sec can i drive
SC 420 SolidEdge--> FilouNC12--> Mach3
cnc-wiki.de/
Bitte Anmelden oder Registrieren um der Konversation beizutreten.
- Mr. B
-
Autor
- Offline
- Forum Nutzer
-
Weniger
Mehr
- Beiträge: 122
- Dank erhalten: 91
14 Mär 2015 11:05 #17249
von Mr. B
For the moment we are just burning, not cutting although black insulation tape cuts well but still testing different materials.
Beer box card
Laminate flooring
Hardboard
Tree wood
We've not been able to burn
Polycarbonate
Aluminum
Stepcraft 420 (version 1) - HXKJ-GS52-400W Air cooled DC spindle - 445nm Blue Laser diode G2
Mr. B antwortete auf Laser engraving - Star Wars Stormtrooper 2W m140
druckgott schrieb: is it possible to cut 4mm wood with this laser? and how long does it take or how much mm per sec can i drive
For the moment we are just burning, not cutting although black insulation tape cuts well but still testing different materials.
Beer box card
Laminate flooring
Hardboard
Tree wood
We've not been able to burn
Polycarbonate
Aluminum
Stepcraft 420 (version 1) - HXKJ-GS52-400W Air cooled DC spindle - 445nm Blue Laser diode G2
Bitte Anmelden oder Registrieren um der Konversation beizutreten.
- druckgott
-
- Offline
- Forum Nutzer
-
Weniger
Mehr
- Beiträge: 310
- Dank erhalten: 230
14 Mär 2015 15:02 - 14 Mär 2015 15:03 #17261
von druckgott
SC 420 SolidEdge--> FilouNC12--> Mach3
cnc-wiki.de/
druckgott antwortete auf Laser engraving - Star Wars Stormtrooper 2W m140
Do you trink its possible to cut wood with a tickness of 4mm or des it take to long?
SC 420 SolidEdge--> FilouNC12--> Mach3
cnc-wiki.de/
Letzte Änderung: 14 Mär 2015 15:03 von druckgott.
Bitte Anmelden oder Registrieren um der Konversation beizutreten.
- Mr. B
-
Autor
- Offline
- Forum Nutzer
-
Weniger
Mehr
- Beiträge: 122
- Dank erhalten: 91
14 Mär 2015 18:50 #17276
von Mr. B
I just tried cutting through 3mm plywood and took too long.
We cut a 10 mm diameter hole at a feed of 15 mm/min on full power it took 2 mins to do 1 pass did 10 passes to get through.
Stepcraft 420 (version 1) - HXKJ-GS52-400W Air cooled DC spindle - 445nm Blue Laser diode G2
Dieser Beitrag enthält einen Bildanhang.
Mr. B antwortete auf Laser engraving - Star Wars Stormtrooper 2W m140
druckgott schrieb: Do you trink its possible to cut wood with a tickness of 4mm or des it take to long?
I just tried cutting through 3mm plywood and took too long.
We cut a 10 mm diameter hole at a feed of 15 mm/min on full power it took 2 mins to do 1 pass did 10 passes to get through.
Stepcraft 420 (version 1) - HXKJ-GS52-400W Air cooled DC spindle - 445nm Blue Laser diode G2
Dieser Beitrag enthält einen Bildanhang.
Bitte anmelden (oder registrieren) um ihn zu sehen.
Folgende Benutzer bedankten sich: druckgott
Bitte Anmelden oder Registrieren um der Konversation beizutreten.
- Mr. B
-
Autor
- Offline
- Forum Nutzer
-
Weniger
Mehr
- Beiträge: 122
- Dank erhalten: 91
25 Mär 2015 09:57 #17719
von Mr. B
Stepcraft 420 (version 1) - HXKJ-GS52-400W Air cooled DC spindle - 445nm Blue Laser diode G2
Mr. B antwortete auf Laser engraving - Star Wars Stormtrooper 2W m140
Making a shoe to house the laser after watching the video posted by Sickone4,
great post.
great post.
Stepcraft 420 (version 1) - HXKJ-GS52-400W Air cooled DC spindle - 445nm Blue Laser diode G2
Bitte Anmelden oder Registrieren um der Konversation beizutreten.
- Mr. B
-
Autor
- Offline
- Forum Nutzer
-
Weniger
Mehr
- Beiträge: 122
- Dank erhalten: 91
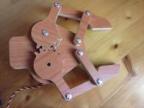
26 Jun 2015 18:40 #22656
von Mr. B
Stepcraft 420 (version 1) - HXKJ-GS52-400W Air cooled DC spindle - 445nm Blue Laser diode G2
Dieser Beitrag enthält Bilddateien.
Mr. B antwortete auf Laser engraving - Star Wars Stormtrooper 2W m140
Our updated laser attachment:
We have found the laser doesn't need mounting quite as high but still require the pole for the wire route.
We have found the laser doesn't need mounting quite as high but still require the pole for the wire route.
Stepcraft 420 (version 1) - HXKJ-GS52-400W Air cooled DC spindle - 445nm Blue Laser diode G2
Dieser Beitrag enthält Bilddateien.
Bitte anmelden (oder registrieren) um sie zu sehen.
Bitte Anmelden oder Registrieren um der Konversation beizutreten.
- dxtinct
-
- Besucher
-

03 Okt 2015 11:35 #25542
von dxtinct
dxtinct antwortete auf Laser engraving - Star Wars Stormtrooper 2W m140
so many pictures but no clear info how we connect a j tech laser to a stepcraft...
can anyone detail ?
Can we rely on on off switch of the laser providing we use estlcam for cut program creation (or engraving program) ?
Thanks.
can anyone detail ?
Can we rely on on off switch of the laser providing we use estlcam for cut program creation (or engraving program) ?
Thanks.
Bitte Anmelden oder Registrieren um der Konversation beizutreten.
- dxtinct
-
- Besucher
-
04 Okt 2015 11:18 #25578
von dxtinct
dxtinct antwortete auf Laser engraving - Star Wars Stormtrooper 2W m140
blanthegenius.. would it be possible to tell us more on how to output a signal for only on/off of the laser connected to relay 1+ gnd wire.... ?
I mean I only have WinNC-PC and estlcam.
Could need some help to understand the commands that make relay1 on/off ?
I'm using the J Tech Photonics 2.8W laser. This requires an external TTL signal on/off for start stop of laser.
Pobably your connection relay1(wire 13) + gnd (wire2 ).. will do the trick but using what commands in the G-codes.
for a different fast holder i made a 3d-printed holder for the J tech laser.
Please see my project here :
J tech stepcraft project link of 3d model
Thanks.
Bitte Anmelden oder Registrieren um der Konversation beizutreten.
- jvalencia
-
- Offline
- Forum Nutzer
-
Weniger
Mehr
- Beiträge: 152
- Dank erhalten: 97
04 Okt 2015 13:49 #25584
von jvalencia
He already told that in this thread.
He used Relay1 pin and GND for on/off. In your control software, configure M03 to actuate over Relay1 pin.
To get the gcode, he modified the postprocessor so a negative Z means laser ON and a positive Z means laser OFF.
This part of the code did the trick:
Stepcraft 2 840
Kress 800 FME
UCCNC + UC100
V-Carve + QCad
jvalencia antwortete auf Laser engraving - Star Wars Stormtrooper 2W m140
dxtinct schrieb: blanthegenius.. would it be possible to tell us more on how to output a signal for only on/off of the laser connected to relay 1+ gnd wire.... ?
I mean I only have WinNC-PC and estlcam.
Could need some help to understand the commands that make relay1 on/off ?
I'm using the J Tech Photonics 2.8W laser. This requires an external TTL signal on/off for start stop of laser.
Pobably your connection relay1(wire 13) + gnd (wire2 ).. will do the trick but using what commands in the G-codes.
for a different fast holder i made a 3d-printed holder for the J tech laser.
Please see my project here :
J tech stepcraft project link of 3d model
Thanks.
He already told that in this thread.
He used Relay1 pin and GND for on/off. In your control software, configure M03 to actuate over Relay1 pin.
To get the gcode, he modified the postprocessor so a negative Z means laser ON and a positive Z means laser OFF.
This part of the code did the trick:
    +---------------------------------------------------
    + Commands output for Plunge Moves
    +---------------------------------------------------
    begin PLUNGE_MOVE
    "[N][S]M03"

    +---------------------------------------------------
    + Commands output for Retract Moves
    +---------------------------------------------------
    begin RETRACT_MOVE
    "[N][S]M05"
Stepcraft 2 840
Kress 800 FME
UCCNC + UC100
V-Carve + QCad
Bitte Anmelden oder Registrieren um der Konversation beizutreten.